
Do you use PowerPoint to make resources in your business? If so, I encourage you to check out my trick for saving time while using this presentation software.
We’re all busy—so let’s get to the point (no pun intended!).
I’m no tech expert, but I have found a wonderful way to work more efficiently in PowerPoint (PPT). The trick takes a little while to set up, but the time saved in the long run certainly outweighs that cost. The trick is customizing your home ribbon. That’s the gray horizontal strip above your workspace.
I’ll explain everything in detail. But I’m going to assume that you know the basics of PowerPoint—how to set the slide size, make a new slide, use a text box, insert images, and so forth. You should also know that my suggestions apply to using the computer version of PPT—not the Chromebook or phone app. Those apps don’t have advanced opportunities for customizing.
A Few Terms
First let’s clarify a few terms, so that we are on the same page (another pun?).
- Quick Access Toolbar
- Ribbon
- Tabs
- Groups
The Quick Access Toolbar is the strip of icons at the very top of the PPT screen. These tools are available no matter what you are working on, so it’s a great place to put those you use frequently. You can change the commands you want on the Quick Access Toolbar, too, but that’s not what we are going to do here.
The Ribbon is the thick gray strip that spans the screen above your workspace, and below the toolbar.

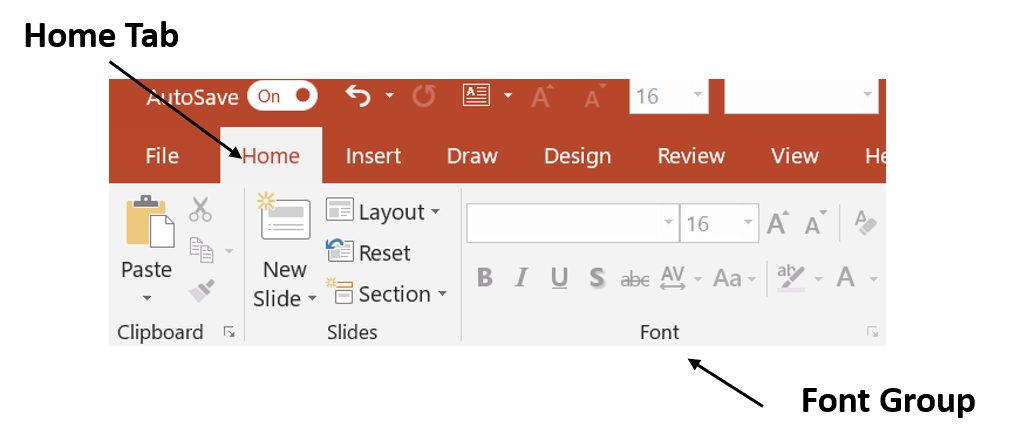
The tabs are the words right above the ribbon. When you click on a tab, it opens up its own ribbon, divided into groups. The groups are separated by vertical lines. You can see in the image below the names of three of the default groups on the Home Tab: Clipboard, Slides, and Font. The other default groups not showing are Paragraph, Drawing, and Editing.
Customizing the Ribbon in 10 Easy Steps!
PPT is a very powerful program, with an incredible amount of tools available. But, to me, one of the time-consuming annoyances of the software is the need to click back and forth from tab to tab to get access to the various tools. The solution? Customize the ribbon so that most of the tools you need are in one place!
First, let’s talk about the tabs.
Because I use PowerPoint primarily for making documents now, I decided to get rid of the presentation-related tabs. I deleted the Transitions, Animations, and Slide Show tabs. (Don’t worry: they are only deleted from view. I can put them back any time.) Now my tabs are Home, Insert, Draw, Design, Review, View, Help, ACROBAT, and Format.

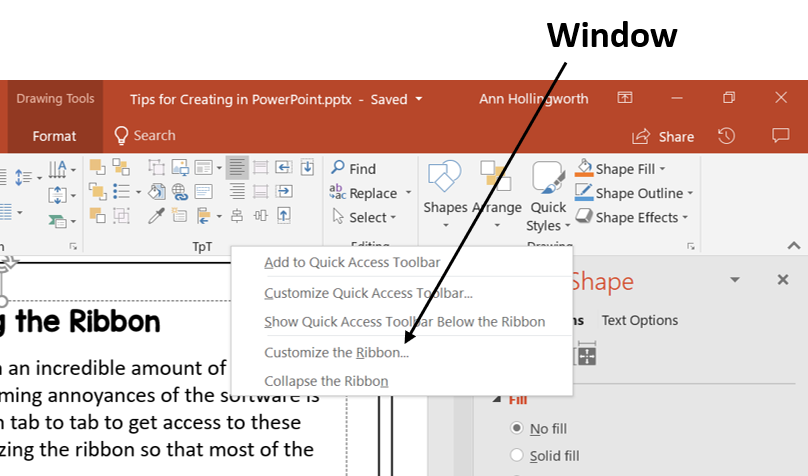
- To customize the tabs, put your cursor on the ribbon and right-click. A window will open up. Select Customize the Ribbon.
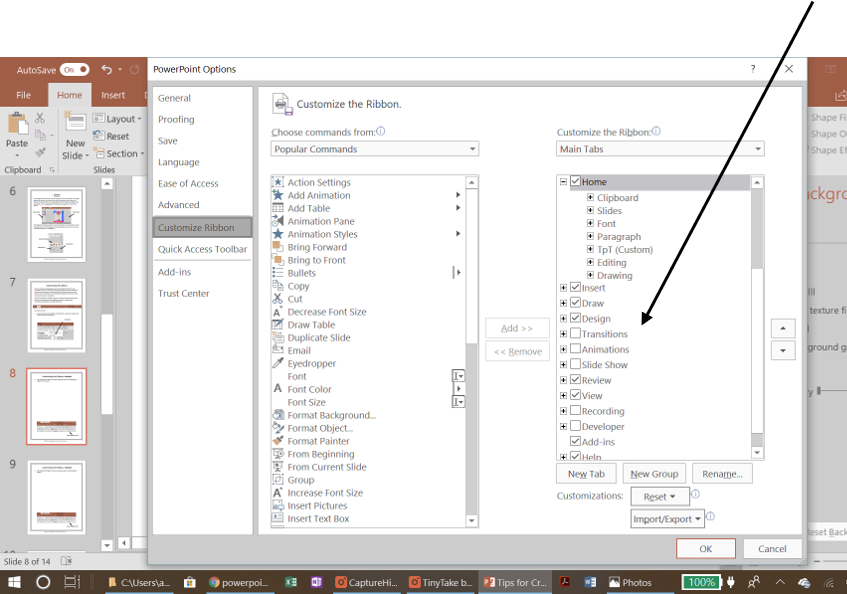
- The PowerPoint Options window will open up with Customize the Ribbon selected from the list on the left. In the Customize the Ribbon/Main Tabs box on the right, you can see (below) where I unchecked the Transitions, Animations, etc. tabs. If there are any tabs you don’t want, uncheck them. Then OK at the bottom.
The next step is creating a New Group. I called mine TpT, because I use PPT to make resources to sell in my TeachersPayTeachers store. I created the new group on the Home Tab, since that’s where I spend the most time on in PPT. My purpose was to have the tools I need mostly in this one place, so I don’t have to switch back and forth between tabs so much.

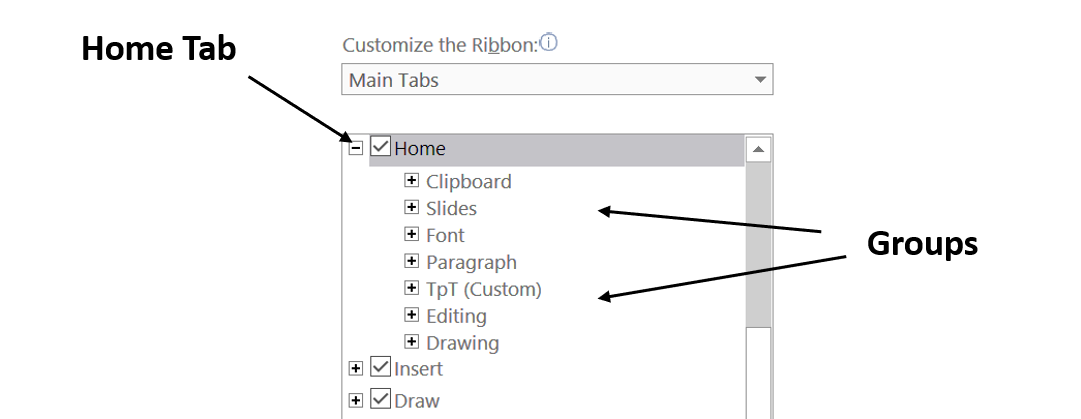
3. To create a new group, open up the the PowerPoint Options window by right-clicking on the ribbon again, if you haven’t already. Under Customize the Ribbon on the right, Main Tabs should be selected from the drop down menu. Find the Home Tab, and make sure it is selected. The current groups on the Home Tab are listed below Home. (Mine won’t look like yours because I already added the TpT group. That’s why (Custom) is next to its title.
4. At the bottom, click on the New Group button and the New Group (Custom) will open up at the bottom of the group list.

5. Select Rename so that you can rename the group. It will be highlighted. I called mine TpT, but you can use any name you wish.
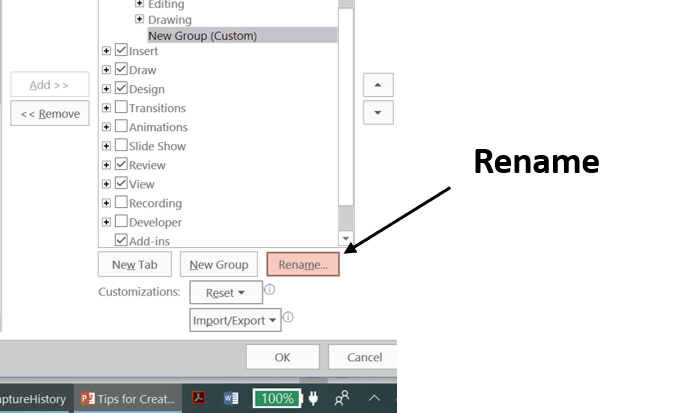
6. The Rename window will open up. Type the name for the group. I typed in Demo to show you how this works.

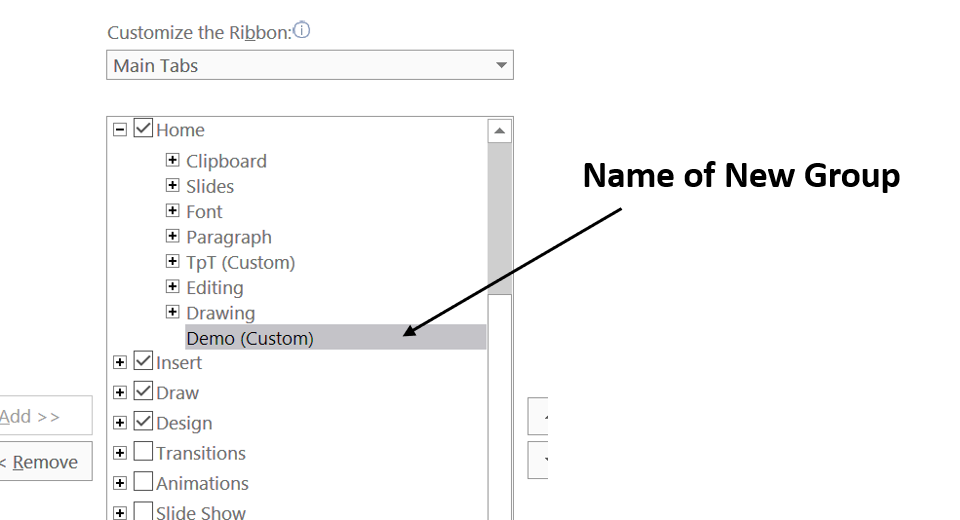
7. The name of your new group should appear under the other Home Tab groups. (Remember: I called mine Demo, to show you how to do it.)
8. Now you want to add commands to your new group. Make sure that your new group (mine: Demo) is highlighted in the right column, and go to the left column (Popular Commands) to find the commands you want to add to your New Group. These will appear on the Home Tab on your ribbon. I started with Bring Forward. (See below for others I added.) 
You may want to click OK at the bottom of the window and check whether your first command appears in your new group on the ribbon before going to the next step.
9. Here comes the fun part! You are going to highlight each command you want to add, click on Add in the middle, and the command will appear under your new group on the right. You can see I have Bring Forward on the right under Demo, and now I am adding Bring to Front. (If you change your mind about a command, you can highlight it and click Remove, and it will disappear from the list.) Be sure to click OK when you have finished!
10. You can explore the different commands you want to add. Some of the ones I added came from All Commands rather than Popular Commands (see commands drop down menu). You also want to think about grouping similar commands together. I added the commands below in the following order:
- Bring Forward
- Bring to Front
- Send Backward
- Send to Back
- Bullets
- Group
- Ungroup
- Format Background
- Eyedropper
- Insert Pictures
- Link
- Reuse Slides
- Layout
- Slide Master
- Align
- Align Left
- Align Right
- Align Center
- Align Top
- Align Bottom
- Align Middle
- Nudge Left
- Nudge Right
- Nudge Up
- Nudge Down
- Quick Print
- Toggle Case
You should be all set with your new ribbon now!
I hope this trick helps you save time and energy when creating resources with PowerPoint!

Feel free to contact me
if you have any questions or suggestions about this process,
and please let me know if any part of this explanation is unclear. Enjoy!


Leave a Reply